
Using Audacity on a Mac: Podcast Editing 101
Audacity is a great app for editing podcast audio. Audacity is open-source software, which is a fancy way of saying the software is free and can be used as soon as you download the app.
When my old laptop died (the PC), I decided to get a Mac and I haven't looked back. Using Audacity on a Mac computer was trickier only because I had to get comfortable with the Mac shortcuts (Command + C, etc.). I learned this the hard way because I spent five hours editing a You Are A Lawyer podcast episode on my Mac, when I typically spend 70 minutes to edit an episode.

Let’s discuss some of the key features of using Audacity on a Mac (including screenshots).
I record podcast interviews with guests through Zoom and Zoom provides me with mp4 files. The mp4 files cannot be played on Audacity, so I convert the mp4 files into mp3 files in order to use the file in Audacity.
You can convert audio files through Descript (move the Zoom mp4 file into Descript, export the file as a mp3, and download the file).
You could use the Cloudconvert website to convert files under a certain size for free (https://cloudconvert.com)
You can also convert files from a video editing program like iMovie or Final Cut Pro.
Open the Audacity app. I have the app downloaded on my Mac and the app has a permanent place in my home bar. I use this app at least once a week to work on podcast episodes.
If Audacity is not downloaded, you will need to complete this step. Then open Audacity, drag and drop the mp3 file from your Mac into Audacity. I have my file saved in my Documents folders on my Mac so that the files are easily stored and organized. It may take a couple of seconds for the file to load and appear in your Audacity app.

This is the full unedited recording which is almost 45 minutes long. Most of the podcast episodes that I produce are 25-30 minutes long so I know that this content will be edited down.
Common Podcast Edits:
Remove *most* umms and uhhs
Remove couches or sneezes
Remove phones ringing
Remove cursing (unless you are producing an explicit show)
Remove “dead air” or empty spaces where the podcast guest is not speaking podcasters.
NOTE: There are many apps that will remove the umms and dead air for you, but I like to listen to the content and remove it myself because some “uhhs” will stay if they are a natural part of the sentence. Similarly, I do not remove so much space from the episode that sentences run together without natural pauses. Do what works for you while editing podcast content with Audacity on your Mac.
PLAYING AUDIO WITH AUDACITY ON A MAC

These are the most common edits that I will complete and are not shared by all
In this screenshot, from left to right, these icons are:
Pause, Play, Stop, Skip to Start, Skip to End, Record
Using the play button will play the audio from the beginning.
The timeline is the length of the audio displayed in minutes and seconds. The timeline is immediately above the audio file in Audacity.

If you want to jump around, move the green arrow (or cursor) anywhere in the timeline to play the audio from that position, which is called Quick-Play enabled.

If you place the cursor within the audio file, a black line will be added and this line will act as a place marker. In this screenshot, the place marker is around 6:33.0, which is six minutes and 33 seconds.
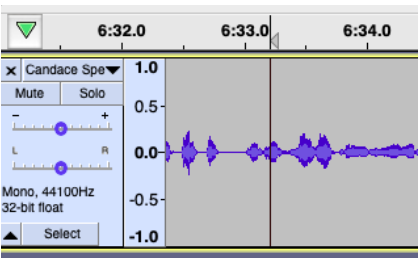
This place marker is important if you want to take a break or need to move content from one place to another. To continue with the above example, we stopped around 6:33.0. Audacity displays the exact timestamp at the bottom of the app. In the next screenshot you will see the exact timestamp which is 6 minutes, 33.218 seconds. Even more details for you to know exactly where to continue working.

You may review the sound of the podcast by reviewing the sound decibel bar. Here, you see that the current sound is in the negative 12 decibels. Click here to learn more about the importance of sound in podcast post production.

Play-at-Speed/Looped-Play-At-Speed
If you have difficulty understanding a section of the recording, you can select a section of the recording and use the playback button. This button will only play the selected section so that you can keep listening to that clip until you understand it.

EDITING WITH AUDACITY ON A MAC
These toolbars may look different to you. It took three or four times of using Audacity for me to realize the features that I use often and move them to comfortable positions on the app.

Frequently used Audacity features
Zoom In - Increase the size of the sound waves on the screen
Zoom Out - Decrease the size of the sound waves on the screen
Silence Audio Section - Removes audio from the selected or highlighted section

Copy - Duplicated the selected/highlighted section of audio; Two sheets of paper icon
Cut - Removes the selected/highlighted section of audio; scissor icon

EXAMPLES: Select audio and use the scissors icon to CUT
When you select audio to be copied or cut, that section will be highlighted in blue (see below). Audacity will display the start and end time of the highlighted section, which is important when you are copying and cutting audio.


Hover over each button to see its’ function
Silence audio selection (the first icon shown) - is used to clear out anything in the highlighted section. Use this feature to remove uhh’s and coughs from a podcast audio.

The only inconvenient thing about Audacity is that there is no option for auto-saving your work. After each hour, I like to save the recording. I will export the file and save it to the Documents folder on my Mac, instead of saving each file as a new project. I always reserve the original audio in case you need to review it again.
As you start to edit your podcast on Audacity, I hope these features helped you understand what you need to start working today. There are advanced Audacity features to use when you add music to your podcast, include audio from multiple files and begin to use effects in your podcast.
If you edit with Audacity and use features that were not discussed, leave a comment and let us know.
